DOOR INSTALLATION

Pierrick of VintagePlantations.com chocolate, and very good chocolate, wrote of his door installation as follows:

Mike; Monsieur Mike of the doors….

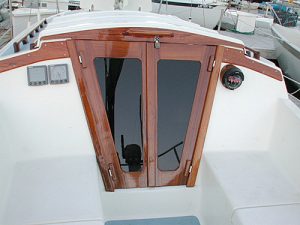
I received the doors and all the accessories in perfect condition. Thank you.
The strand board door would not fit properly in its grove, because of the boat imperfections. Geometry is never followed to a “t” anywhere in the world and definitely not by a boat we all believe are of the female gender.
I sanded down the left door part which fit in the grove making sure I kept the same radius. I read and rereda your instructions and followed them. You have done a great job and form the look of your designs and nuances I could tell you had anticipated all the current issues which could have raised from setting these doors on inclined hinges. Your experiences and professionalism is underlined at every curve of these doors. Thickness of wood and craftsmanship in the details comforted me in choosing you for making these doors. I would be happy to be a source of reference if you need one. It took me 4 hours to do the job , because I wanted the doors to be completely equidistant by one millimeter to each side of the frame. It could be done in two hours. The colors of the wood you pick matches completely the frame. I have no idea how you managed to match the wood based on just one picture. .. Experience and intimate knowledge of the type of wood Catalina uses probably.

I will send you a picture once I am done. The little wood round cover parts are to cover the screws in the wooden door hinges?

Hopefully my chocolate smeasures up to your craftsmanship and you will not be too disappointed.

Cheers,

Pierrick

A GOOD WORD ABOUT DINING ON A SAILBOAT

Hello,

My wife and I met you at the recent Boat Show in Seattle… and I promised to send you some photos of your Cockpit Table installed aboard the S/V Alchemyst – a 38′ Bavaria Center Cockpit Ocean we crew for the boat’s owner.

And I finally got a chance to dig out some shots … but all of them feature meals served on your table… and I don’t have any that show the table itself and the way we installed it.

I will take some pix of the table as soon as the sailing season begins …but I thought you might get a kick out of seeing how your table is used when we are cruising.

Your table is obviously the center of all things gustatory on board on board the S/V Alchemyst.

It is where our guests gather at the end of a day of cruising to enjoy drinks followed by dinner … or just a place to hang out for a game of scrabble…

The cockpit table is sturdy and obviously well made. After 6 years of hard use, it still looks brand-new. Our guests comment on the elegant look of the teak and ash wood you used to craft it.

Cruising Concept’s Cockpit Table is highly recommended by Captain Claus Cruises!

Sincerely
Claus


OKAY EVERYONE FIND THE TABLE.

Signed,

Dr. Teak

FINISHING WITH TEAK OIL

If you are interested in a satin finish requiring low maintenance then an oil finish is the way to go. After the penetrating oil for two coats and plenty of drying time for two days, flood the surface with oil and wet and just lightly with 320 sandpaper touch the surface all over. This is meant to be done quickly as each successive coat will catch any areas unsanded from last time. The trick is to wipe back each coat until there are no streaks but a sheen left. This allows you to not have to worry about not having hit all the areas carefully with sandpaper. Each coat should dry for one day.  I like three coats, five with the penetrating oil, for doors, five for a cockpit table, 9 for an interior table and 12 for floors. The floors will never soil and after 10 years with just soap and water will look like the day you put them down. The tables can be maintained with Lemon Pledge. The best trick is sanding with Watco Dark Wax after all the oil coats with 600 grit paper for the interior table. It will look like a museum piece.

OIL AND VARNISH AFTER TREATMENTS

After all the sanding and polishing to the desired finish often I will apply a wax as not only a sealer but as a non stick surface. Too often a hinged leaf may make contact with the varnished edge of the main table. The problem is that the two finished surfaces will stick and bond to each other ruining the finish. A waxy surface cures that. All so when shipping many surface may contact each other. Certainly paper towel can be put between the surfaces but a coat of wax just gets rid of the worry of the paper sticking as the new surfaces continue to degas. Watco Dark finishing wax adds to any of the oil or varnished surface a degree of a rich finish even though the way is labeled as satin.

Sanding Surfaces for Brightwork

In getting the best out of an oil finish I will apply two soaking coats of oil as discussed before.  My favorite is to sand the third coat of teak oil lightly with 320 all over without concentrating in any area. 320  black wet dry can be used with the best cutting results and back filling of pores wiping the residual off leaving a light sheen with no streaks. Any bleed back will be dulled eliminating the little shining spots with the next sanding. Two more coats later I will go to 400 and then 600 two more coats later. I have never found power sanding of any sort in this case to help in time and quality. Subsequent to the final coat of oil wax may be used as discussed before from WATCO. The dark satin floats the paper and allow for efficient cutting with a 1000 grit paper back by a small sponge. Try it as you will be amazed and never turn back.

Mike

OIL FINISHES PART 2 TECHNIQUES

One of the most critical parts of building up the oil finish is to let the wet sanded layer dry a little increasing the thickness of the coat before wiping to a no streak finish. You must leave a sheen behind as much as possible for good build up but at the point you leave streaks it is hard to make sure you remove them with the next coat. This is especially true as you use finer and finer grit. In the beginning 320 will correct most evils quickly while 600 grit later will only polish streaks left behind. Waiting 24 hours between coats is best.

STARBOARD DOORS

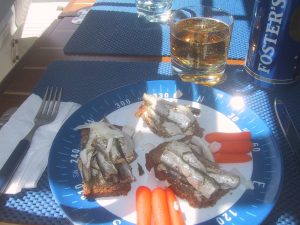
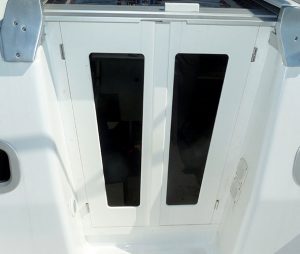
Starboard Doors are Companionway Doors made from HDPE, high density poly ethylene, and is offered under many trade names. The most common uses are for Companionway Doors, Cockpit Tables, and 4 Mug Binocular holders. It is extremely durable and holds screw threads remarkably well. 
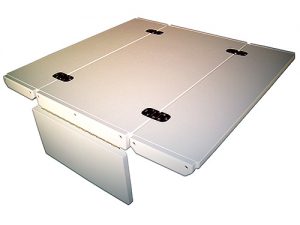
Our most popular color is polar white. We have been making these products for over 24 years now and offer unique, and advanced designs to last a life time

Mike

COMPANIONWAY DOORS

While companionway doors are not a substitution for the drop boards, it is important to pick a robust design. We offer both teak and plastic, Starboard, doors. Teak is the strongest hands down over the plastic as the plastic yields under very little force. That is why we use a 3/4 by 1 3/4 weather fascia overlapping the center between the two doors. 
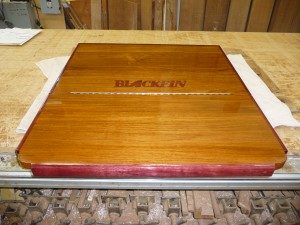
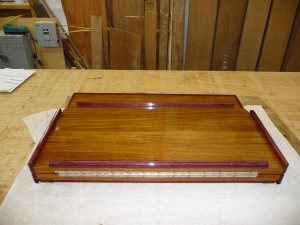
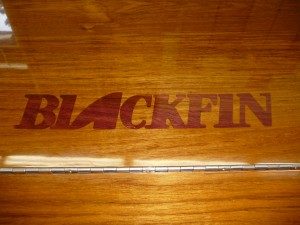
This gives a very thick 1 1/2 inch cross section as compared to other doors that may have a 3/8 lip which neither provides suitable strength under a direct blow even with internal reinforcement nor proper resistance to water intrusion.  These doors made with a 7/8 inch overlap and 1 1/2 cross section are intended for every day live aboard use as opposed to doors intended just for day use. In addition doors may be made as bifold to one side. A stainless piano hinge is used in the center and the entire assembly folds to either port or starboard. This is very convenient to lift off and carry in one hand without the two halves sliding opposite each other and out of your hands.

Mike

FAQs, OH PLEASE!


Blackfin 29 Table opened

The most frequently asked question I get from customers is that they wish they could see what is going on in the shop. I am always happy to show off what is at work on the bench just do not look to


Blackfin Interior Table, folded

close as you might see what is not finished and what is imperfect. The real truth is that I never wanted anyone to see and as of a consequence took very few pictures of the early years which covers 20 of the last 24 years. It was funny mix of shy, humble, and afraid of even constructive critiques. Why now? Because with age I have learned not to care what someone thinks of a closet perfectionist ( and far from being


Blackfin Logo

perfect ). So today we are sharing Scott Cornell’s table from Vancouver, Canada. Hope you like it but I was just saying I was not supposed to care anymore.

Mike

Inlays For Tables

Artwork Below

  • 8" Compass Rose $375.00
  • 10" Compass Rose $475.00
  • 12" Compass Rose $675.00
  • 18" Compass Rose $995.00
  • 24" Compass Rose $1275.00
  • 4 Point Cardinal $175.00
  • 8 Point Cardinal $350.00
  • Anchor $1600.00
  • Special Designs at 8" $375.00

    Mermaids, Nautilus, Seahorses

  • Ursa Major $300.00
  • Ursa Minor $300.00

    Includes North Star